Working with Style Editor
Prerequisite: Ensure that the Is Production Meta Data Read only checkbox is unchecked before proceeding with the configuration. Enabling this checkbox in the configuration environment disables all options in the Style Editor and sets the Administrator interface to Production Metadata Read Only mode. If changes to Metadata are necessary, please contact your administrator to enable them
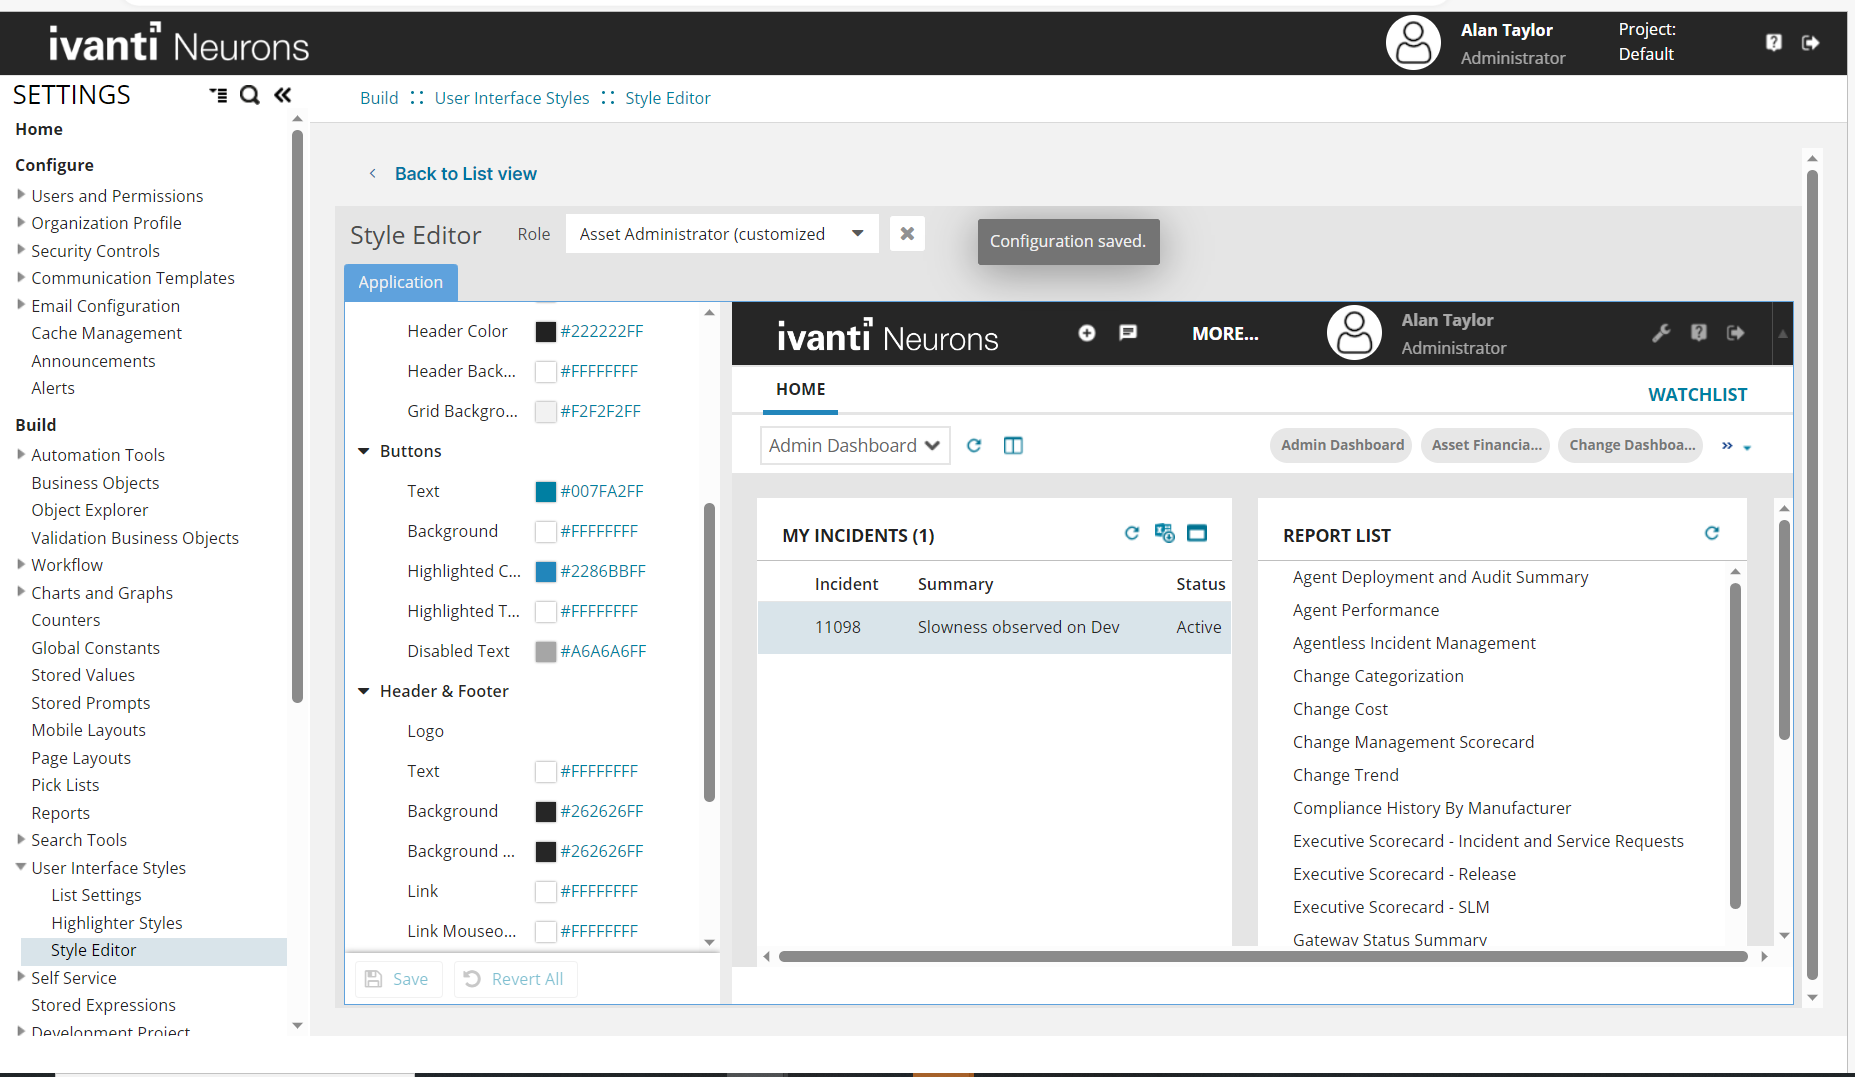
The Style Editor page allows you to customize your workspaces using background color, fields, menus, buttons, and text, as well as the logo of your choice. You can preview the changes you make in the Style Editor instantly on the right pane. This feature enables you to experiment with different color combinations, logos, and images for your Neurons for ITSM and Self Service Mobile user interfaces, and the Login Page.
The Default UI and Theme Settings offer three distinct role types, each catering to specific user requirements:
•All Roles
•Self Service ( For roles using modern self-service UI based on classic ERA UI)
•RA Roles ( For roles using modern analyst UI)
You can also add exceptions for a specific role.
To access the Style Editor, do the following:
1.Log in to Ivanti Neurons for ITSM as Administrator.
2.From the Configuration console, click Build > User Interface Styles > Style Editor.
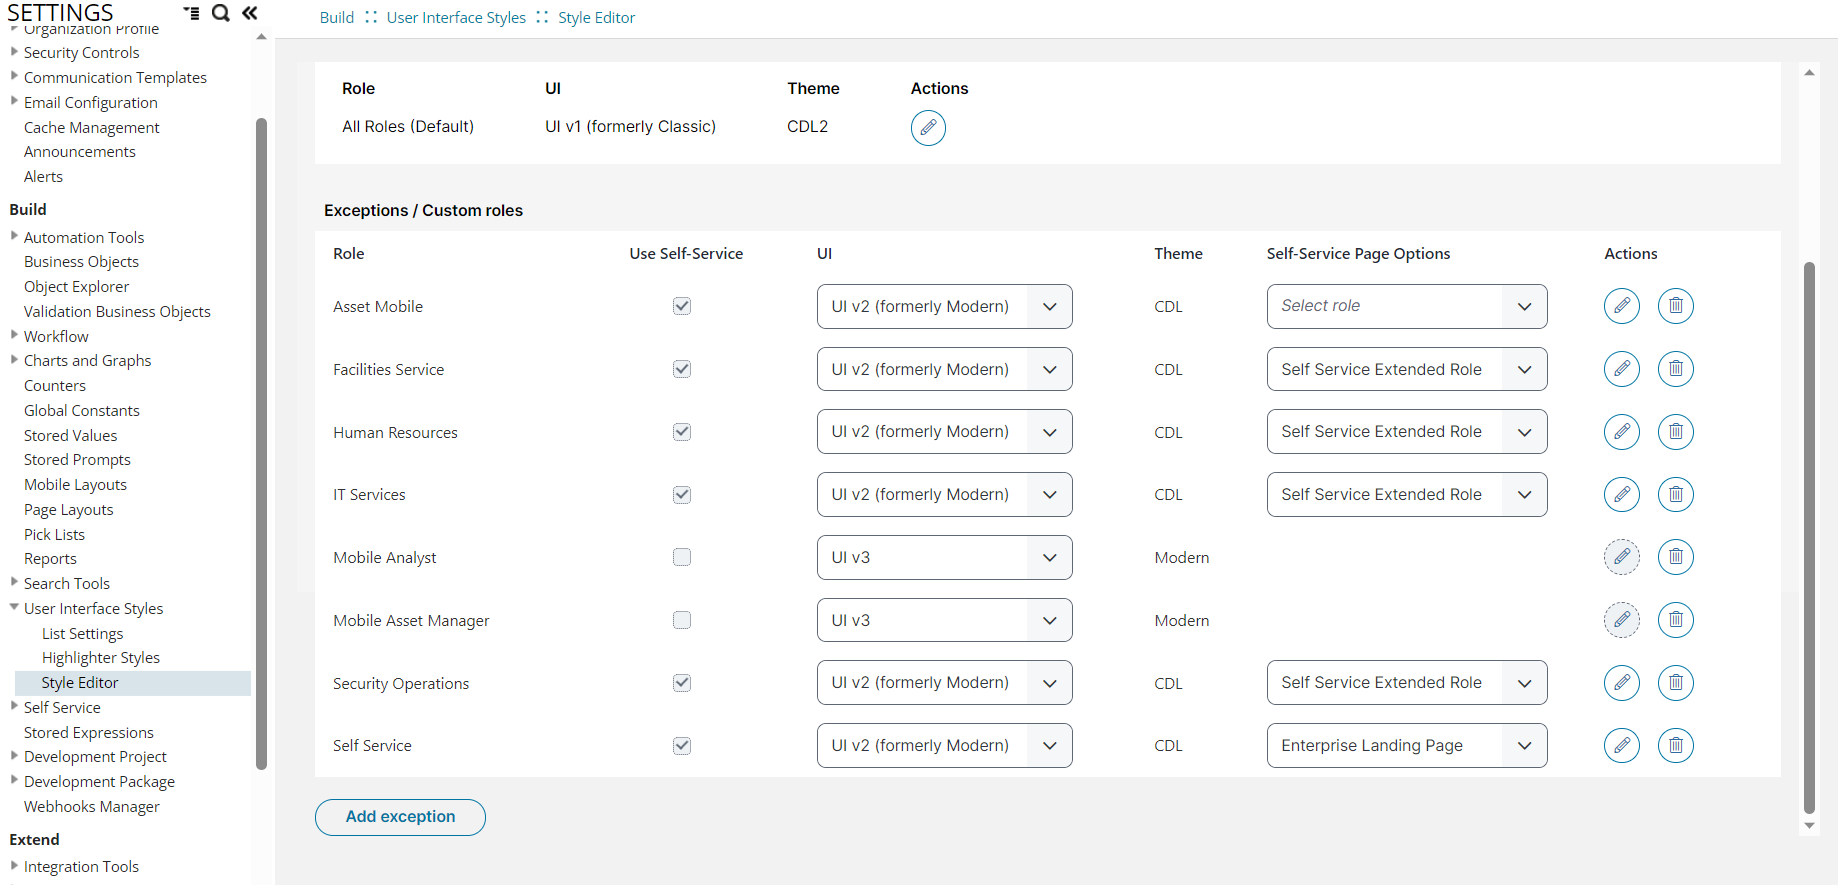
The application displays the following sections:
•All Roles
•Exceptions/Custom roles
2 .Click ![]() or the UI drop-down list corresponding to the role you want to customize the theme based on your requirement.
or the UI drop-down list corresponding to the role you want to customize the theme based on your requirement.
Ensure that you edit one role at a time and remember to save it. Avoid making multiple edits to a single role simultaneously.
You can click the Back to List view link to go back to the Login page.
The Login Page section allows you to configure the Neurons for ITSM login page. The same login page is displayed for all roles and user interfaces..
To configure the Login page for all roles:
1.Access the Style Editor. See Accessing Style Editor
2.Under Login Page, click ![]() .
.
3.Specify the following customization details:
•Common layout, text and links
•Backgound color and image
•Title text and color
•Logo
•Form Settings
•Copyright
•Left Bar
4.Click Save.
See Styling the Login Page . For information on making color changes, see Working with Colors in the Style Editor.
To restore the Login Page to its default configuration, click the remove customization icon  at the top of the Style Editor.
The All Pages section allows you to configure and customize the Neurons for ITSM console . The settings that you configure on the All pages section affect all roles in Neurons for ITSM except Self Service Mobile. See Configuring the Self Service Mobile User Interface.
By default ,All Pages UI is set as UI V1 (formerly Classic) and the default theme for classic roles is CDL2.
The interface for a specific user role can be configured. Changes made to the default role affect all roles, except for any roles that were configured individually. For more information on roles, see Working with Roles.
To configure the style for a role:
- In the Configuration console, click Build > User Interface Styles > Style Editor. The application displays the Style Editor.
- In All Pages section, select a role from the Role drop-down list. Configure the color specifications for the selected role.
- Click Save. The drop-down menu lists this role as customized.
The Save button is enabled only when a value is entered for any of the parameters.
Restoring a Role to its Default Style
To restore a role to its default style, do the following:
- In the Configuration console, click Build > User Interface Styles > Style Editor. The application displays the Style Editor.
The Application tab is selected by default.
- From the Role drop-down menu, select a customized role.
A customized role can be distinguished from other roles in the list. For example, Administrator (customized).
- Click the Remove Customization icon
next to the Role drop-down list. The colors for this role are reset to its default settings.
The Exceptions/Custom Roles section allows you to add exceptions for a specific role. This section includes predefined roles such as Self Service Mobile, Mobile Analyst, and Mobile Asset Manager. Within the Exceptions/Custom Roles pane on the Login Page, you can do the following:
•Select the UI for a specific role.
•Choose Self Service Page options.
•Edit the workspace's appearance.
•Delete custom roles that you've created.
This section displays the following columns:
•Role - Displays the role for which the exception is added.
•Use Self Service-Displays checkbox for Roles. If the role is Self Service, the check box is selected, and for non Self Service role, the checkbox is cleared.
•UI- Displays the UI for that role. For Self Service roles, two UI options are displayed
•UI V2 (formerly Modern)
•UI V3 (Self Service Management V3) and for non self services. currently option UI v3 is displayed.
For the non Self Service UI, there's only one option available: Modern Analyst UI.
• Theme - Displays the theme based on the UI , If the UI selected is UI V2(formerly Modern), the theme will be CDL and for UI V3, the theme will be Modern.
You can create exceptions for particular roles and switch between the Self Service UI and the non Self Service UI.
When adding role exceptions:
•Determine whether your role is Self Service or not.
•If it's a Self Service role, select the the UI Self-Service checkbox.
•If it's not a Self Service role, proceed to choose the UI. Add and save your exception.
To add an exception for a role:
1.Log in to Ivanti Neurons for ITSM as Administrator.
2.From the Configuration console, click Build > User Interface Styles > Style Editor. The application displays the Login Page.
3. Under Exceptions/Custom roles pane, a list of roles are displayed.
4.For the role, that you want to add an exception, click the UI drop-down list to select the UI options. The UI drop-down list displays the following options:
•UI V2 (formerly Modern)
•UI V3
If you select the UI V2 (formerly Modern) option, select the Self Service Page Options The Self Service Page Options drop-down list displays the following options:
•Enterprise Landing Page
•Self Service Extended Role
5.Click Save. A confirmation message displays that the exception is saved successfully.
If your newly created role does not appear under the Administrator drop-down list or if the role does not take to the selected UI, you can add the exception to that role again.
If a user with roles such as Self Service Mobile, Self Service User, or any other top-level Service role does have not access to the Self Service UI V3, you can grant access by enabling it. To enable access to UI V3 with Self Service role, delete the existing exception and then select the Self Service checkbox to add a new exception.
To add a exception, see Adding Role Exceptions .
To enable a role to access Self Service Management:
1.Log in to Ivanti Neurons for ITSM as Administrator.
2.From the Configuration console, click Build > User Interface Styles > Style Editor. The application displays the Login Page.
3.In the Login page, click Add Exception, The Add Exceptions/Custom Roles dialog box appears.
4.Select a role from the Role drop-down list, and then click Self Service toggle icon to enable Self Service.
5.Select the UI from the drop-down list. A confirmation message displays that the Exception/Custom role is created successfully.
To create a Self Service role and to clone a role , see Creating a Role section and Cloning Roles sections in Setting-up Roles .
Use the Page Designer page to create reusable templates by exporting and importing page layouts, settings, widgets, and module information. You can easily modify widgets, settings, and properties. Additionally, you can export and import changes to Global Settings, such as altering the page layout, editing or removing the logo, adjusting primary and secondary buttons, and more.
Exported files include background images, colors, widget configurations, and module details. This flexibility ensures consistent design across workspaces, allows sharing of custom layouts, and provides backups for future use.
Benefits of the export/import functionality include:
•Consistent style usage across different workspaces.
•Sharing custom styles with others as a .zip file.
•Creating backups of existing page settings for future reuse.
For instance, users can:
•Add new widgets to the page
•Remove existing widgets
•Modify settings of existing widgets, like List widgets
•Adjust global settings properties
•Provide translations for widget titles
•Customize elements such as logo, content width, buttons, typography, and headers
•Tweak options for specific widgets such as List widgets, Hero Banners, Text, and Search widgets
These templates can then be imported to quickly set up new workspaces without starting from scratch.
.To export the page settings and global settings template:
1.Click Page Settings or Global Settings, and select Workspace from the drop-down list.
2.Make changes as required, and then click Publish.
3.Click Actions and select Export to save the template.
4.Enter a file name and save it in the preferred folder for future reference.
To import the page settings and global settings template:
1.Select the Workspace from the drop-down list.
2.Click Actions, and select the Import.
3.Locate the saved Page settings or Global Settings template file.
4.Click Yes to confirm the overwrite in the Import Changes popup.
5.After successful import, click Ok.
6.Click Publish to apply the configuration to the Page Settingsor Global Settings tab.
Click Save and Continue editing to keep changes as a draft or click Delete draft to discard it.

